Soft proofing is a technology, also used by Adobe software, based on device ICC profiles and, in some cases, standard color spaces. It simulates the printed result on a monitor, as opposed to a paper proof, obtained with a printer.
Its main function is to simulate the colors achievable by the printer through the monitor's ICC profile. In other words, when we view an image on a monitor calibrated to specific parameters, what we see is not what we will get in print but only the representation of the digital image, from its source profile to that of the monitor. This display tells us nothing about the colors we could achieve with a specific printer. This is why a monitor color proof is needed.
The printer's ICC profile, like that of the monitor, is able to represent, through conversion, the colors of a digital image in the best possible way. In practice, the printer driver or RIP itself converts the image profile (source) to the printer profile (destination).
Unfortunately, if you have not activated the color proof it will be impossible to predict the print result.
Enabling soft proofing causes Adobe software to convert the image to the printer profile before representing it through the display profile. This is obviously only a "virtual" conversion designed to help the user perceive the printed result and does not actually occur in the file; this way, what we see on the monitor will be much closer to the printed result. Color matching depends on the quality of the monitor, the printer's ICC profile, and the display system used to compare the monitor and the soft proof.
On this last point, and without going into too much detail, I recommend getting an internally calibrated monitor (such as an Eizo CG or NEC Reference) and a good light source that's not too close to the monitor and, preferably, at a position about 90° from the perpendicular to the monitor itself. This way, the user won't be 'blinded' by the monitor but will have to shift their gaze 90° to compare the print first and then the monitor.
Color proofing on the monitor with Photoshop
Let's say we need to print a photograph on a specific paper and a specific printer; let's simulate, for example, printing a JPEG file in sRGB on an Epson SC P800 printer with Photo Paper Glossy paper.
After opening the image in Photoshop, we look for the Proof Setup command in the View menu, within which we will choose Custom….

Fig 1
Once selected, the command opens a dialog box where we can find the printer profile and configure the various test print options.

Fig 2
Under "Device to simulate," you should find the ICC profile for your paper and printer. If it doesn't appear in the list, download it from the paper/printer manufacturer's website and install it. At this point, you can set both the rendering intent and the paper white simulation and, after making the necessary adjustments, run a test print. Notice how, in Figure 3 on the right, the image color "transforms" on the monitor to represent the closest color the printer can reproduce using that ICC profile. The photo on the left is how it looks without the color proof; the colors are different.

Fig 3
In the same dialog box, we also find other options that allow us to better control the monitor simulation. First, we find the rendering intents, which allow us to understand, precisely from what we perceive on the monitor, which one is best for the photograph in question.
We can also select the Black Point Compensation checkbox, which is highly recommended, and if we want the monitor to also simulate paper white and ink black, we can activate the last two options, Simulate Paper Color and Simulate Black Ink. Paper white and printed black are certainly different from those on the monitor, so if you activate these options, the monitor's white becomes different, generally darker, and the monitor's black becomes a dark gray; obviously, this varies from profile to profile.
Color proofing on a monitor with Lightroom
If the image is opened in Lightroom, the soft proof command is found in the Develop module at the bottom of the central image window. If it is not visible, it must be activated from the drop-down menu at the bottom left, shown in fig. 4.

Fig.4
Once the color proof checkbox is active, at the top right, under the histogram, we can select the color profile through the More menu, at the bottom of the Profile item. See fig. 5/6
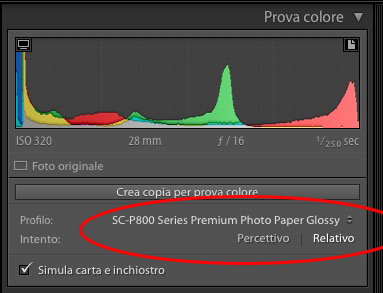
Fig. 5

Fig. 6
In this panel, below the histogram, you can also change the rendering intent options (only two in Lightroom) and the paper white and ink black simulation. To see a comparison between the original and the color proof, you can activate the Before/After view in Lightroom at the bottom left by clicking on the Y|Y button, as shown in figure 7.

Fig. 7
Conclusions
As described in this article, the procedure for evaluating (and, consequently, being able to criticize or not) the colors of a print cannot ignore 2 things:
1- from calibrating your display and the subsequent creation of an ICC profile for the monitor itself.
2- by activating a color proof on the monitor using the correct profile of the printer you want to simulate.